Maps, fuel injection, and Tuning for Cannondales/ATK/Sagem 1000
Basics
Cannondales fuel injection is anything but unique, except for the
fact that it is on a dirt bike. The computer is actually an automotive
unit, and the fuel pump also fits a Ford Ranger! This is the way it works,
conceptually;
The operating system in the computer is similar to DOS in your
computer, but in these units it comes in a .hex file, so it is called the
‘OP CODE’ or the HEX CODE’. The computer actually does very little computing.
What it does do is get inputs from the sensors on the motor; air temperature,
coolant temperature, air pressure, crankshaft position, throttle opening
in %. It calculates engine speed based on the last few crankshaft positions,
then uses this calculated RPM and the throttle opening to find a value
for fuel delivery and spark advance from a look up table; commonly called
a ‘MAP’. The value that is looked up in the map is then adjusted
for the other variables (temps and pressure). This is done for every engine
cycle, and when the time is right, the fuel injectors are opened for the
appropriate period of time, and the ignition is fired at the precise moment
that it is needed. Then the cycle repeats.
The D&M kit is the owners tool that allows you to fiddle with
this stuff. You will be doing your jetting with it, you can troubleshoot
with it, and you can change maps with it. Here is a spreadsheet
(thanks, Radical Ron!!) that details what the maps look like. It includes
3 maps, that of the E, C, and X model motorcycles. And if you like that
kind of stuff, here is a spreadsheet
that compares the C and E maps.
 The fuel delivery is identical, and not
charted here. The only difference is the ignition advance, which is detailed
and graphed. There is no difference at all from 75% throttle and up, and
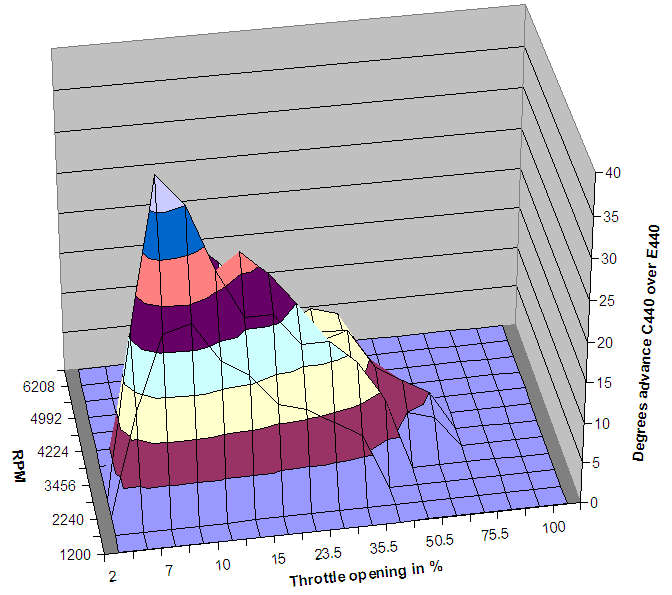
above about 4500 RPM. The picture at the right is a chart of the ignition
difference between the C and E. Note that the chart covers only rpm range of
1200 to 6200 rpm, there are no differences outside of this zone. What this means is that the E map will give you all
of the power the C map will, but with smoother response at the smaller
throttle openings.
The fuel delivery is identical, and not
charted here. The only difference is the ignition advance, which is detailed
and graphed. There is no difference at all from 75% throttle and up, and
above about 4500 RPM. The picture at the right is a chart of the ignition
difference between the C and E. Note that the chart covers only rpm range of
1200 to 6200 rpm, there are no differences outside of this zone. What this means is that the E map will give you all
of the power the C map will, but with smoother response at the smaller
throttle openings.
Maps
The most popular and fun thing to do with the D&M kit is to change
the map. There are a number of maps available for the downloading at ‘Cannondaler.Com’,
thanks to the ultimate ‘dale enthusiast Jim. The X map, designated by it’s
filename 01XXX.ccf, is the official MX map. There is also a C map, an E
map, and the S map. The X and S maps are identical, except that the S maps
has a more aggressive T/S (throttle sensitivity). The official maps all
use a T/S of 150 except for the S map as mentioned above. What a T/S of
150 means is that when the throttle is moving towards more open, the injected
fuel value will be compensated by the T/S in percent; so the mixture will
be 150% of calculated while the throttle is moving. This has a delaying
effect on the motors response, which was added after many riders complained
about the incredibly quick throttle response of the original bikes.
So, without consideration of the throttle sensitivity, there are basically two
maps from the factory; the X/S maps, and the C/E maps. The X/S are pretty
easy off the bottom, then rage out to the limits of the motor. The C/E
map is most powerful at the lower RPMs, then much more mild up on top to
conserve fuel and to be easier to ride on the longer cross country races.
The C is slightly more aggressive below 4000 RPM and below 65% throttle
opening for the dryer cross country races. The X/S, E, and C maps are all
available at ‘Cannondaler.Com’ with T/S settings from 110 to 150 in steps
of 10. 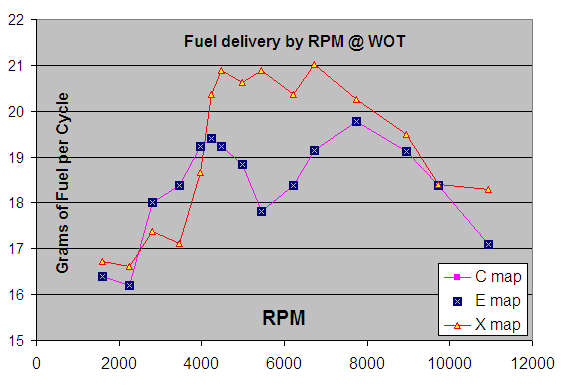
The next step, then was to fiddle with the maps.
The chart you see to the right is a graphic representation showing how much fuel
is delivered at what RPM for the two basic map types. The ignition curve in each
map is optimized for the amount of fuel that will be delivered.
The first breakthrough
was when Radical Ron put together an experimental map for me, the HarryMoto
Combo map. I asked him to try the E map up to 4000 RPM, and then patch
in all the numbers from the X map. Combined with the T/S of 110, this is
the most aggressive map for the ‘dale. Later on GP suggested using the
C map for the bottom end, and the GP Combo map was born. The combo maps
are identical at wide open throttle, but the GP map is slightly more aggressive
below 4000 RPM and below 65% throttle opening. Loading a map takes about
two minutes with the D&M kit, so it shouldn’t be hard to plug in some
maps and see what you like. The combo maps are also available at ‘Cannondaler.Com’,
free for the downloading.
Additionally, if you wish to help preserve your Cannondale crank for the
duration of your ownership, here are links to the '10k' maps. These are the
HarryMoto Combo maps with the rev limiter set to 10,000 rpms. This matches the
design limit of the stock bearings. <Note: it turns out that the 10K rating on
the bearings is in GREASE, not in an oiled application. I still run a lowered
rev limit, but I'm using 11K now.> The factory rev limiter setting is
11,800 rpm.
HarryMoto Combo 10K 110
HarryMoto Combo
10K 120
HarryMoto Combo
10K 130
HarryMoto Combo
10K 140
HarryMoto Combo
10K 150
And one more map that I made
for my daughter, the 'Amber Moto map'. It's the leanest part of the two maps
above with the rev limiter set at 7000. It's still a handfull for young riders,
but more managable and the ridiculous rev limit keeps the speed from building
too quickly if things get out of hand. It's terrible to ride, you hit the
limiter as soon as you twist the throttle!
Amber Moto Combo 7K 150
Jetting
This isn’t your daddy’s thumper. Jetting isn’t the same anymore,
so if you know what you are doing with brass that will be just a little
help in jetting your ‘dale. Luckily they don’t need jetting like a carbureted
bike does. Changes in the weather, changes in altitude, running really
fast or really slow… it just doesn’t matter, the EFI compensates for all
that. You may need to jet it because the factory sent them out pretty rich
for the most part, or you may have chopped the restrictive cones out of
the exhaust system. For whatever reasons, when you jet this bike you will
be fooling with two values; ‘OFFSET’ and ‘FLOW’. The flow is just what
it sounds like; flow through the fuel injectors. The offset adjusts for
how long it takes for the flow to get up to speed when the injector opens.
We’re talking milliseconds here, so it certainly matters. Flow is how many
milligrams per minute comes out of the injectors. Offset is how many milligrams
of fuel will be missing from a 2.5 millisecond shot from the injectors due to
the opening time of the injector,
as compared to a simple flow times time calculation. If you lower the offset,
you tell the computer that there is less fuel missing on a short shot and
it will compensate by making things leaner for the shorter duration pulses
of the injectors. If you lower the flow value, you are telling the computer
that the injectors are flowing less and it will compensate by making things
richer right across the board. Many folks will increase the flow by 1%
and take .1 to .2 off of the offset to get the mixture right with everything
stock.
To actually jet the thing, you can set the idle to 2100 and then
note the throttle position. Adjust the offset by .1, then set the idle
again and note the throttle position. The offset setting that gives you
the lowest throttle position to maintain 2100 RPM is the optimum idle setting.
You might go back .1 richer from there to get a more steady setting, like
we used to do when we were turning pilot screws and changing pilot jets.
To adjust the main jet, so to speak, you will have to resort to the WOT
runs and then read the spark plug. Not fun, as the spark plug is pretty far down
in there. Sort of makes you miss the old two-stroke, getting that spark plug
out! The tricky part here is that the flow effects the offset a lot, and the
offset effects the flow a little. You can do the main jet first, and minimize
the effects of the second adjustment. You can also use the
spreadsheet to see exactly what effects the adjustments
will have.
 Here is
an example shot of the flow/offset spreadsheet. In this example the flow was
2400 from the factory, and the offset was .70. The bike in the example has had
the flow set to 2350 and the offset set to .6. The original fuel delivery would
be on the 100% line in the middle of the chart. The effect of each change is
charted, so you can see that the offset is a non-linear function and the flow is
quite linear. Another important thing to consider is that the effects are not
based on RPM, but rather on the length of the injector pulse in milliseconds.
It's not quite the same, check the example above to see the injector times at
different RPMs.
Here is
an example shot of the flow/offset spreadsheet. In this example the flow was
2400 from the factory, and the offset was .70. The bike in the example has had
the flow set to 2350 and the offset set to .6. The original fuel delivery would
be on the 100% line in the middle of the chart. The effect of each change is
charted, so you can see that the offset is a non-linear function and the flow is
quite linear. Another important thing to consider is that the effects are not
based on RPM, but rather on the length of the injector pulse in milliseconds.
It's not quite the same, check the example above to see the injector times at
different RPMs.
You can download the spreadsheet
to get a look at the changes you are making to YOUR bike and the effect they have on
the mixture in different areas. Just input your flow/10 (as in the example,
2400/10 = 240) and the offset. There are also blocks for the flow and offset
you are considering, the ones with 0.6 and 2350 in the example. The chart shows the difference between what you input
originally and what you input as the new settings. Remember that the original
settings are represented as the 100% line, and the changes are shown in percent
from that baseline. Good luck, and use your
common sense; it you run it too lean, you WILL burn it up!!
Troubleshooting
Obviously, this is a more advanced subject. The D&M tool will tell
you what everything reads, report faults, and will allow you to replace
a corrupted hex code. It will not tell you what it means; it only reports
the values. Check out the forums at ‘Cannondaler.Com’ to get some experienced,
professional (and amateur) help!
Gearing
If you like fooling with spreadsheets, you'll love the Gearing
& thrust spreadsheet! This charts speed/RPM/gear, and calculates
how hard the rear wheel pushes on the ground to move you forward from the
only dyno chart I've been able to find. This is all based on a C-440, and
I'm not sure about the dyno information. Anyone who has a decent dyno chart,
PLEASE email it to me at
DynoChart@HarryMoto.Com!!Tap and Die #'s
For those of you who have actually made it this far, here is a spreadsheet
that details what drill to use when you have to make a threaded hole. I've
found it to be very useful!